Managing Expense Entries
Clarity is essential when managing expense reimbursement requests. On OurFamilyWizard, co-parents can rely on the Expense Log to manage their shared parenting expenses with ease and precision. In this tutorial, learn how to create new expenses, update existing expenses, and respond to expense requests on the mobile app.
In this tutorial:
Understanding the Expense Log
The Expense Log is where you'll go to start managing expenses on OurFamilyWizard. Here's a quick overview of what you'll find in this section.
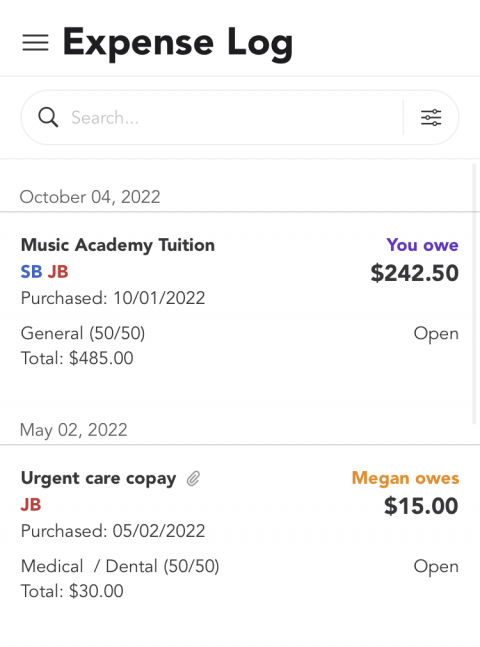
Expense Log Layout
Expenses added to the Expense Log are displayed in a list format in a chronological order based on when the expense was created. Users can scroll through the Log to view older expenses.
Each expense displays the creation date, the expense name, the category, the total, the amount owed/paid, and the status. This keeps all of your expenses organized and easy to read as new ones are added and payments are made for reimbursement. Here is a quick breakdown of each part:
Created: This is the date the expense was initially created and is displayed on the top of each expense. The Expense Log is organized chronologically by the creation date from newest to oldest.
Expense Name: the name of the expense is in bold, with the initials of the child(ren) assigned to the expense and the actual purchase date of the expense displayed beneath it.
Category/Total: Each expense is assigned a category based on how the expense is split between the two parents, along with the total amount of the expense.
Owes/Paid: based on the category and total, the expense displays the amount owed and by which parent. The color assigned is based on the parent who needs to make the reimbursement. Once a payment is made on the expense, it will switch to saying “(parent) paid”.
Status: The status of the expense reflects the most recent action taken on it. To learn about the different expense statuses, visit this help page.

Totals
The totals give you a quick look at the amount each parent owes for all outstanding expenses. Once an expense is paid, it is deducted from the total amount the parent owes. Refused expenses are not calculated in the total. To view the totals, click on the three horizontal lines in the upper left-hand corner to open the Expenses menu.
Searching and Filtering Expenses
At the top of the Expense Log there are options to either search of filter the expenses. To search expenses, simply type in the search bar next to the spyglass icon.
Expenses can also be filtered by date, category, children, status, and owes/paid. To filter expenses, click on the toggle icon next to the search bar and then select what you’d like to filter for. Once you’ve selected your filer, click “Apply”.
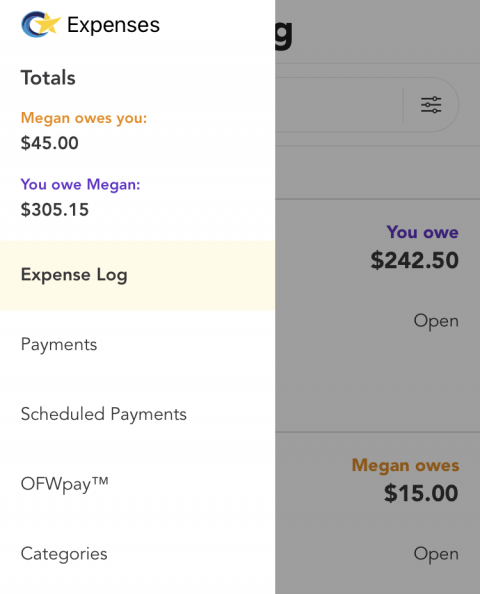
Navigating the Expenses Menu
Within the OurFamilyWizard mobile app, Expenses are organized into one menu to grant easy access to the Expense Log, Payments, Categories, and OFWPay. To access the Expenses menu, first tap on the Expense Log icon at the bottom of the screen shaped like a dollar sign. This opens directly to the Expense Log. Then click on the three horizontal lines in the upper left-hand corner to open the Expenses menu and navigate to the desired section.
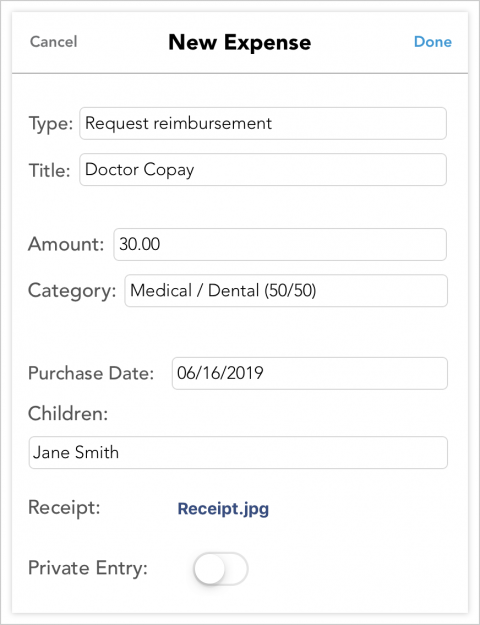
Creating New Expenses
-
From the Add Item menu, select New Expense.
-
Complete all required fields. These fields include the following:
-
Type: You can select to create an expense as a “Reimbursement Request” or an “Expense I need to pay”.
-
Title: Title of your expense
-
Amount: Enter the full amount of the expense in question
-
Category: Select the category that will break down the total amount of your expense into the correct totals of responsibility for you and your co-parent.
-
Purchase Date: Select the date that your expense was incurred.
-
Children: Select the child(ren) that the expense is for.
-
Receipt: Tap the camera icon to take a photo of your receipt or select a photo from your existing photos. This is an optional field, but you are encouraged to attach a receipt image.
-
Private Entry: Toggle this switch to green if you wish to create this expense as a private entry that only you can see. Leave this switch untoggled if you wish for your co-parent to view this expense.
-
-
Tap Save in the top-right corner of the screen.
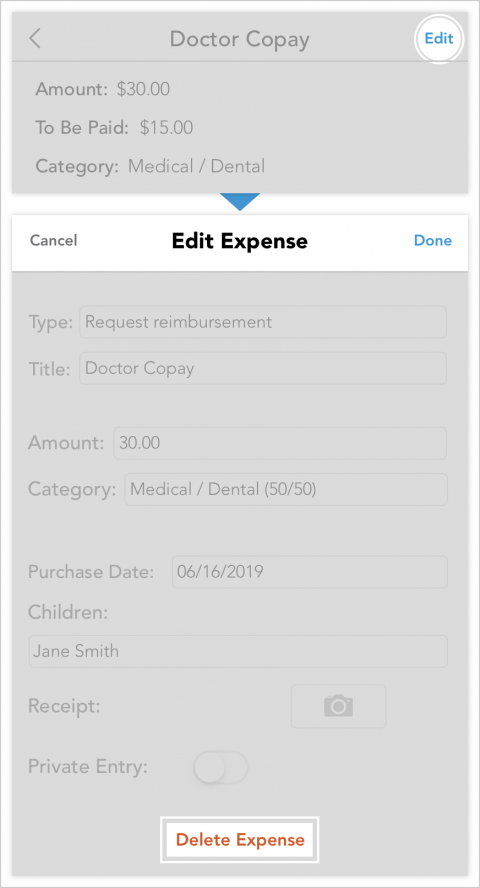
Editing or Deleting an Expense
Note: You can only update or remove expenses that you have created and that have not yet been responded to by your co-parent.
-
From the app's main navigation menu at the bottom of the screen, tap the Expense Log icon.
-
Scroll through the list of expenses and locate the expense you'd like to update. Tap the expense to view it in full detail.
-
To update or remove the expense, tap on edit in the top-right corner of the screen.
-
Edit: Tap Edit at the top-right corner of your screen. Once you've made your changes, tap Done.
-
Delete: Tap Delete Expense at the bottom of your screen. This will remove the expense in question from your Expense Register.
-
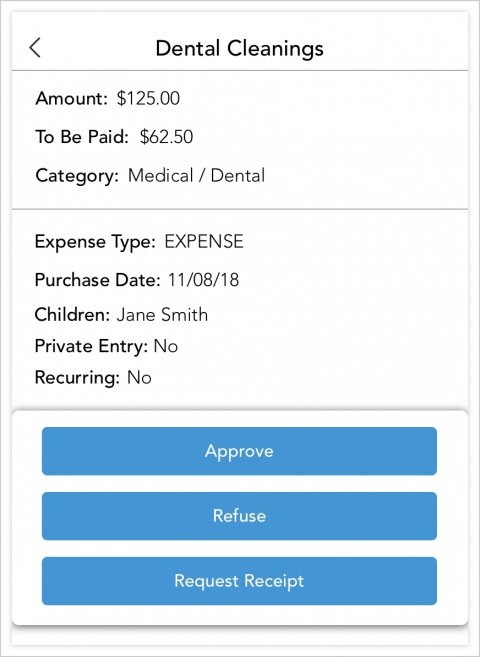
Responding to an Expense Request
-
From the app's main navigation menu, tap the Expense Log icon.
-
Locate the expense to which you'd like to respond to and tap it to view it in full detail.
-
If the expense entered by your co-parent is one for which they are requesting reimbursement, you will have 3 options.
-
Approve: Tap “Approve” to agree to the expense in question.
-
Refuse: Tap "Refuse" to refuse the expense in question
-
Request Receipt: Tap “Request Receipt” to request that your co-parent attach a receipt to this request. You will not see this option if a receipt is already attached to the expense you are viewing.
-
Expense Status Definitions
The status of an expense request will update depending on the actions taken by the co-parents.
- Open: Expenses that have not been responded to or had any payment activity will have a status of open.
- Approved: The co-parent to whom the request was made has agreed with the expense.
- Refused: The co-parent to whom the request was made has refused the expense.
- Approved (Payment Unconfirmed): The co-parent responsible for payment has logged a Check/Other payment in the system. The Check/Other payment is waiting for confirmation of receipt by the other co-parent.
- Approved (OFWpay in process): A payment through OFWpay™ has been scheduled but not yet completed.
- Paid: The expense has been marked as reimbursed or a Check/Other payment has been confirmed by the receiving co-parent.
- OFWpaid: A payment has been successfully made for the expense through OFWpay™.