Managing and Documenting Payments
With the OurFamilyWizard Expense Log, parents are able to track payments made outside of the website or make payments directly to each other using OFWpay™. Learn how to manage payments on the mobile app with this tutorial.
In this tutorial:

Making Full or Partial Payments on Existing Expenses
-
From the app's main navigation menu, select the dollar sign or Expense Log icon.
-
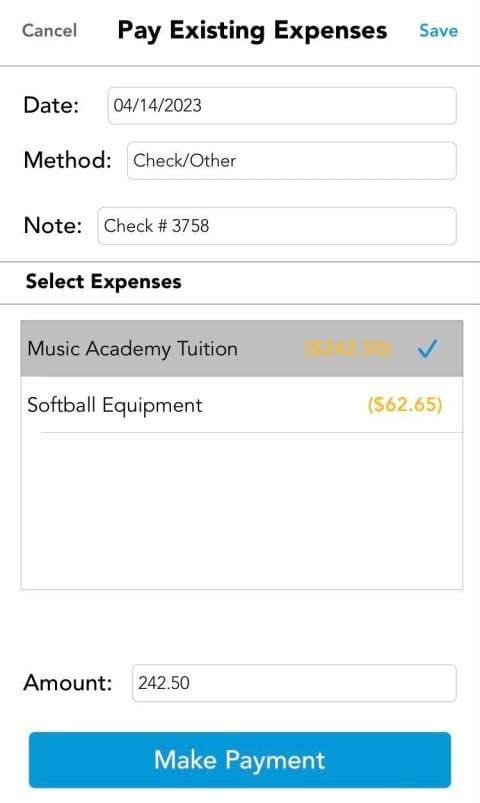
Tap the “+” add item button. Select Payment. This is where you can select existing expenses from your Expense Log to pay.
-
Select your payment date. This notes when your payment will be sent.
-
Select your payment method:
-
Check/Other: Outside of OurFamilyWizard payments will give you the option of a payment note (cash, check number, money order number, etc.) and payment amount.
-
OFWpay™: Use OFWpay™ to send the funds to your co-parent via a documented, electronic payment. If you do not see OFWpay™ as an option, either you, your co-parent, or both do not have an active OFWpay™ account.
-
-
Select to pay just one expense or multiple expenses.
-
Single Expense: If you select to make a payment on a single expense, you have the option of paying in full or updating the payment amount to reflect a partial payment.
-
Multiple Expenses: When multiple expenses are selected for a payment, the total amount for each expense must be paid.
-
-
Tap the Make Payment button at the bottom of the screen.
Your co-parent will be notified of the full or partial payment. If made via OFWpay™, receipt of your payment will be documented once the funds are transferred. If made outside of OurFamilyWizard, your co-parent will have to confirm receipt of payment for the expense history to be updated.

Confirming a 'Check/Other' Payment
Payments made via OFWpay™ will update automatically once reconciled. For payments made outside of OurFamilyWizard (i.e., via cash, check, money order), you will need to confirm receipt of those payments for the expense history to reflect the payment. Note: Only confirm Check/Other payments that you have already received.
-
From the app's main navigation menu, select the Expense Log icon.
-
Tap on the three horizontal lines in the upper left-hand corner to open the Expenses Menu and select the Payments tab.
-
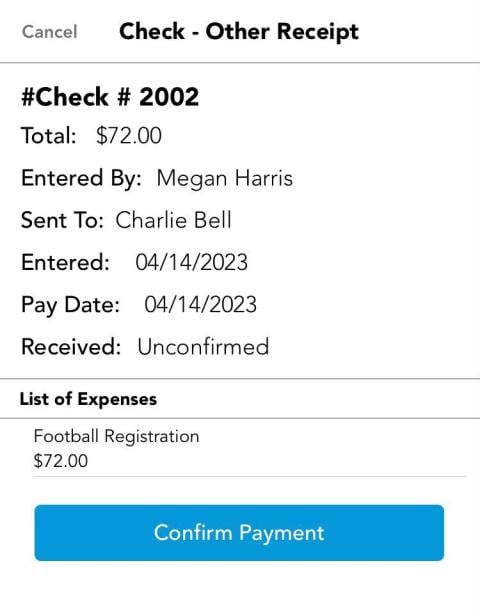
From the Incoming Payments tab, locate the payment that you wish to confirm and tap it to view it in full detail.
-
Take the time to review the details of the payment, such as the payment amount and the expenses to which it applies, before proceeding.
-
Tap Confirm Payment. This will change the status of the payment to Confirmed.
Do not confirm a payment that you have not already received. Once a payment is confirmed, that confirmation cannot be reversed and the Expense Log will update to show that you received funds for the expenses in question.

Marking an Expense as Reimbursed Without a Payment Entry
Co-parents who are receiving payment through means outside of the website do not have to wait for their co-parent to log a payment to mark an expense as reimbursed.
Note: Only expenses for which you have received reimbursement should be marked as reimbursed.
-
From the app's main navigation menu, select the Expense Log icon.
-
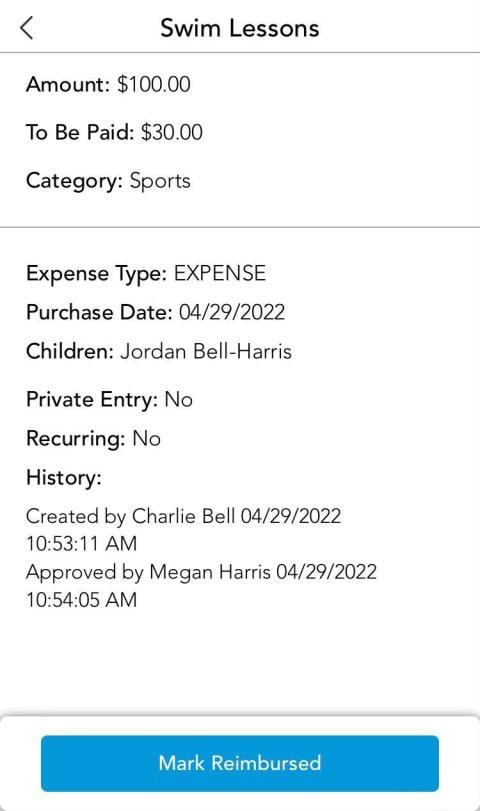
Find the expense you wish to mark as reimbursed and tap it to view it in full detail.
-
Take the time to make sure that you have selected the correct expense, reviewing expense details and reimbursement amount.
-
Tap the Mark Reimbursed button to update the expense to a status of Paid.
Only mark an expense as reimbursed if you have received funds for the expense in question. Once an expense is marked as reimbursed, the action cannot be reversed and the expense log will be updated to show that a payment was successfully made between co-parents.